Is your dryer running but not heating? Clothes coming out damp after long cycles? You’re likely dealing with a failed dryer heating element — one of the most common causes of heater repair issues in electric dryers.
In the humid New Orleans climate, where dryers work overtime battling moisture, a faulty heating element can turn routine laundry into a frustrating ordeal. The good news? Many homeowners can fix this themselves with basic tools and careful steps, saving $200–$400 compared to professional heater repair bills.
This comprehensive guide from Zees AirConditioning Inc. walks you through everything: diagnosis, safety, tools, exact replacement steps, testing, troubleshooting, preventive maintenance, costs, brand tips, and when to call experts. We’ll also cover related heating repair concepts so you understand how appliance issues connect to your home’s overall comfort systems.
Whether you’re in Gretna, New Orleans, Terrytown, Harvey, Marrero, or the Westbank, this guide empowers you with professional-level knowledge while highlighting when professional heating repair New Orleans services make sense.
Why Dryer Heating Elements Fail (And How It Relates to Broader Heater Repair Needs)
The heating element is a coiled wire (usually nichrome) inside a metal housing at the back or bottom of your electric dryer. When electricity flows through it, it generates intense heat that warms the air blown into the drum.
Common failure causes include:
- Age and wear (most elements last 8–15 years)
- Lint buildup and poor ventilation causing overheating
- Power surges or electrical issues
- Thermostat or thermal fuse failure (often fails alongside the element)
- Overloading or running with clogged vents
Important Note: This guide focuses on electric dryers. Gas dryers use an igniter and gas valve instead — never attempt gas appliance repairs yourself. For any gas-related heater repair or safety concerns, contact licensed professionals immediately.
In New Orleans homes, high humidity and occasional power fluctuations make regular heating element checks and vent cleaning essential — similar to preventive heating repair and maintenance for your central HVAC system.
Symptoms of a Bad Dryer Heating Element
Before diving into repairs, confirm the issue:
‣ Dryer runs and tumbles but produces no heat
‣ Clothes remain damp or take 2–3x longer to dry
‣ Burning smell (from overheating element or lint)
‣ Dryer trips breaker or blows fuse occasionally
‣ Visible damage or breaks in the coils (after opening)
Other possible causes (rule these out first):
| Symptom | Likely Cause | Quick Check |
| No heat + no tumbling | Drive belt or motor | Listen for drum turning |
| No heat + error code | Control board or thermistor | Check display codes |
| Takes forever + hot vent | Clogged lint vent/exhaust | Feel exhaust air outside |
| Trips breaker | Short in element or wiring | Multimeter test |
| Intermittent heat | Faulty thermostat or fuse | Continuity test |
If your symptoms match a failed heating element, proceed. Many “heater repair” calls actually stem from simple, fixable component failures like this.
Safety First: Critical Precautions Before Any Heater Repair
Never skip safety steps — dryers involve 240V electricity and high heat.
‣ Unplug the dryer completely from the wall outlet (or turn off the dedicated 30-amp double-pole breaker at your panel).
‣ Pull the dryer away from the wall for full access.
‣ Wear safety gloves and eye protection.
‣ Work in a well-lit, dry area.
‣ Take photos of every wire connection and screw placement before disassembly.
‣ If you smell gas, see sparks, or feel unsure about electrical work — stop immediately and call a professional.
For complex heating repair New Orleans jobs or if your dryer is under warranty, professional service is always the safest choice.
Tools and Materials You’ll Need
Gather these before starting:
| Tool/Material | Purpose | Recommended |
| Nut drivers (1/4″, 5/16″, 3/8″) or socket set | Remove panels and element screws | Essential |
| Phillips & flathead screwdrivers | General disassembly | Must-have |
| Digital multimeter | Test continuity/resistance of element, fuse, thermostats | Critical for diagnosis |
| Flashlight or headlamp | See into tight spaces | Highly recommended |
| Vacuum with brush attachment | Clean lint from housing and vents | Prevents future failures |
| Camera/phone | Document wire positions | Saves time on reassembly |
| Replacement heating element | Match your exact model number | Buy OEM or quality aftermarket |
| Optional: Thermal fuse + high-limit thermostat kit | Often replaced together | Smart preventive upgrade |
| Work gloves & safety glasses | Protection | Always |
Pro Tip: Locate your dryer’s model number (usually on a sticker inside the door rim, on the back, or behind the control panel) before ordering parts. This ensures the correct heating element.
Step-by-Step: How to Replace the Heating Element in a Dryer
Follow these steps carefully. Total time for most DIYers: 45–90 minutes.
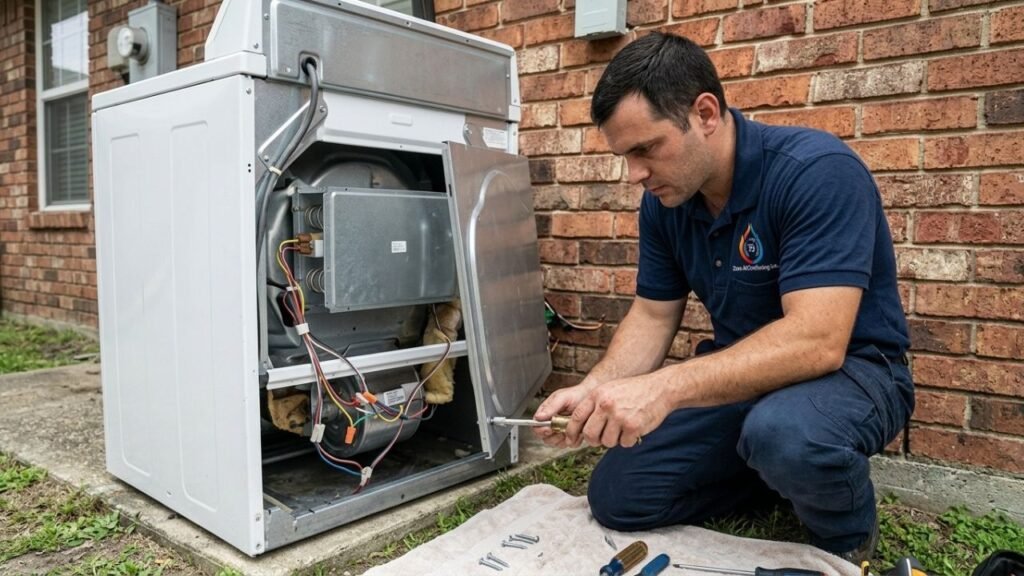
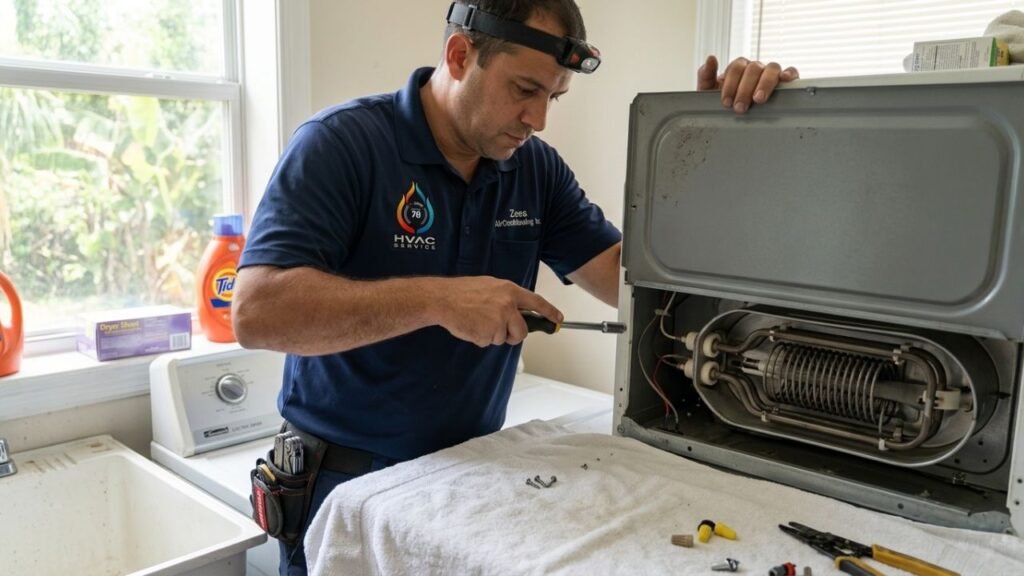
Step 1: Disconnect Power and Prepare the Dryer
Unplug the dryer or shut off the breaker. Pull it out 2–3 feet from the wall. Remove the exhaust vent hose if attached (clean it thoroughly while you’re at it).
Step 2: Remove the Back Panel
Most electric dryers have a large rear access panel or lower back panel secured by 8–12 screws.
- Use nut drivers to remove all screws.
- Carefully lift or slide the panel off (it may be heavy or have a lip).
- Set screws aside in order or label them.
Some models require removing the top panel first (clips or screws at the back), then the front or side panels. Consult your model’s manual if unsure.
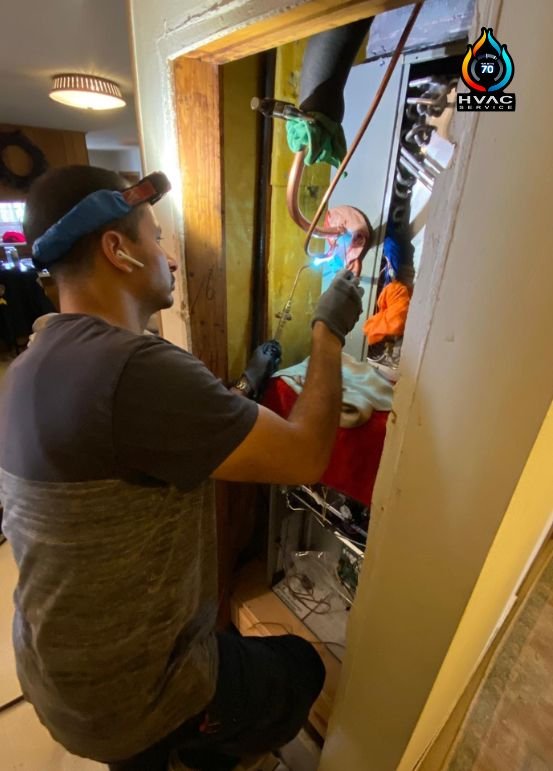
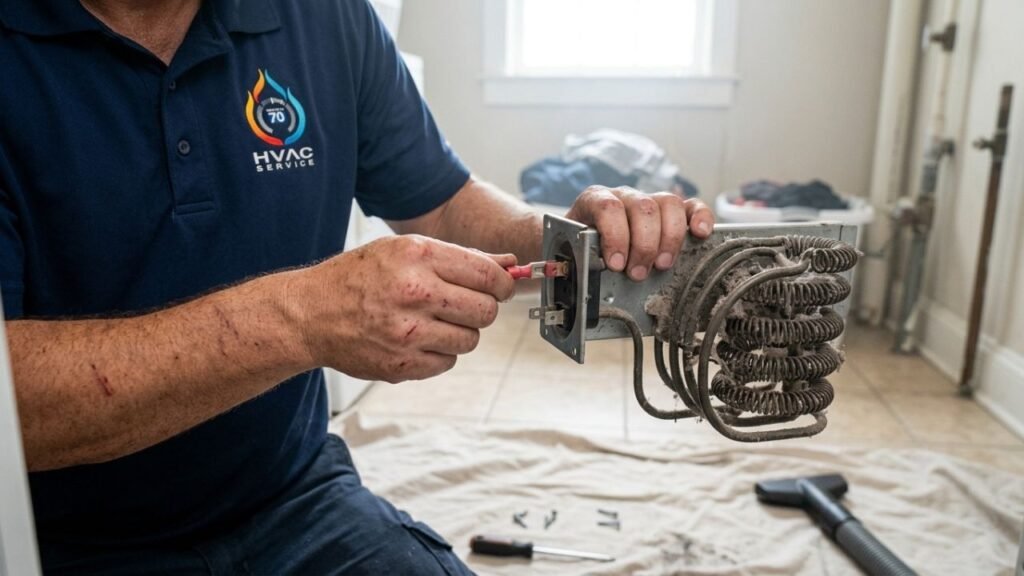
Step 3: Locate and Inspect the Heating Element Housing
The heating element is typically a cylindrical or rectangular metal canister at the bottom rear or lower side. You’ll see thick coiled wires inside and usually 2–3 wire terminals plus a thermal fuse or thermostat attached to the housing.
Step 4: Document and Disconnect Wires
Take clear photos of all wire connections.
Disconnect the wires from the element terminals (they usually pull off or have spade connectors). Note colors and positions.
Step 5: Remove the Old Heating Element
Remove the 2–4 screws securing the element housing to the dryer frame or blower housing.
Carefully slide or lift the entire assembly out. Some models have a cover or bracket you must transfer to the new element.
Step 6: Install the New Heating Element
- Transfer any attached components (high-limit thermostat, thermal fuse, or mounting bracket) from the old housing to the new one if required.
- Slide the new element into position exactly as the old one was.
- Secure with the original screws.
- Reconnect all wires exactly as photographed (wrong connections can cause immediate failure or safety issues).
Step 7: Reassemble and Test
Reinstall the back panel and all screws.
Reconnect the exhaust vent (use proper clamps).
Push the dryer back into place.
Plug it in or restore power at the breaker.
Run a short test cycle (no clothes or just a few towels) on high heat.
Feel the exhaust air — it should be hot within 5–10 minutes. Listen for unusual noises.
Step 8: Final Lint Cleaning and Verification
Vacuum any loose lint from the housing area and around the blower. Clean the lint filter and exhaust duct thoroughly.
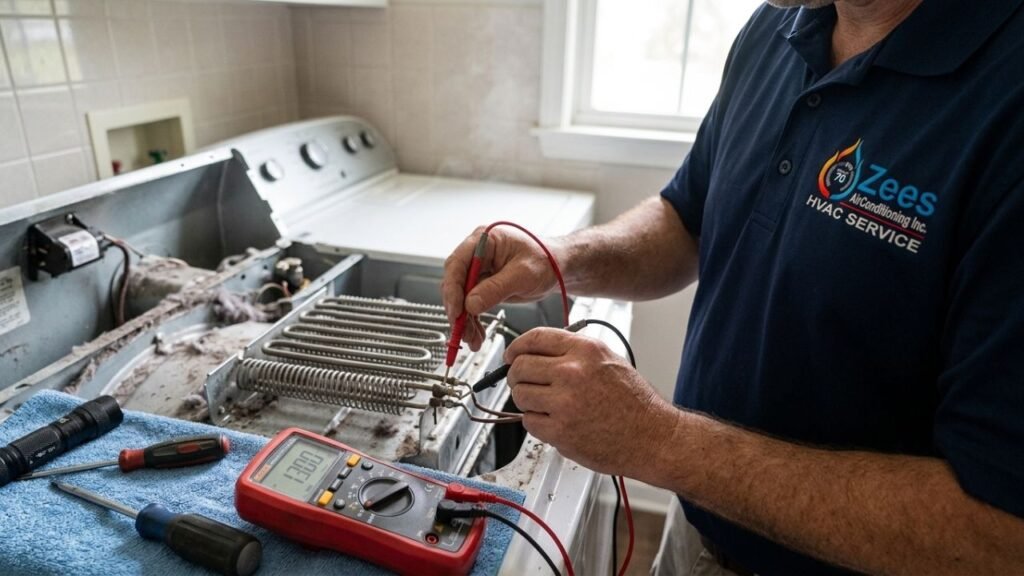
Testing the Heating Element and Related Components with a Multimeter
This is the most important diagnostic step — don’t skip it.
- Set multimeter to Ohms (Ω) or continuity mode.
- Disconnect power and wires from the element.
- Touch probes to the two main terminals on the element.
- Good element: Low resistance reading (typically 8–50 ohms depending on model).
- Bad element: OL (open line/infinite resistance) or very high reading → replace.
Also test these common failure points on the same housing:
- Thermal fuse — should show continuity (near 0 ohms). If open → replace.
- High-limit thermostat — continuity when cool.
- Cycling thermostat — similar test.
Many technicians replace the heating element + thermal fuse + high-limit thermostat as a kit because one failure often stresses the others.
Brand-Specific Tips for Popular Dryers
- Whirlpool / Maytag / KitchenAid: Often straightforward back-panel access. Element usually at bottom rear.
- Samsung: May require top or front panel removal on some models; element can be more compact.
- LG: Similar to Samsung; check for error codes like tE1/tE2 that point to thermistor issues.
- GE / Hotpoint: Reliable access; sometimes the element is behind a lower rear panel.
- Speed Queen / Commercial-style: Robust elements but same testing principles apply.
Always search “your exact model + heating element replacement” on YouTube for visual confirmation before starting.
Common Mistakes to Avoid During Dryer Heater Repair
‣ Forgetting to photograph wire connections
‣ Using the wrong replacement part (model mismatch)
‣ Not cleaning the vent system (new element will overheat and fail quickly)
‣ Ignoring related components (fuse/thermostat)
‣ Rushing reassembly without double-checking screws and seals
‣ Attempting repairs on gas dryers or 240V wiring if inexperienced
Preventive Maintenance: Stop Future Heating Element Failures
A new heating element can last another 10+ years with proper care:
- Clean the lint filter before every load.
- Clean the exhaust duct and outside vent hood at least once a year (or every 6 months in humid New Orleans).
- Avoid overloading the dryer.
- Use the correct heat setting for fabrics.
- Consider a vent cleaning service or professional heating repair inspection if you notice reduced airflow.
These habits also improve energy efficiency and reduce fire risk — the same principles Zees AirConditioning Inc. applies to whole-home heating repair and HVAC maintenance.
Cost Analysis: DIY vs Professional Heater Repair
| Option | Average Cost | Time | Best For |
| DIY Heating Element Replacement | $25–$120 (part) + your time | 1–2 hours | Handy homeowners with multimeter |
| Professional Appliance Repair | $180–$450 (parts + labor) | Same day or next | Complex issues or no DIY comfort |
| New Dryer (mid-range) | $500–$900+ | Delivery + install | Old dryer (>10–12 years) or multiple failures |
| Full Heating Repair New Orleans (HVAC context) | Varies | — | Central home heating systems |
Average pro cost for dryer heating element replacement: Around $230 nationally. DIY saves significantly when done correctly.
When to Call a Professional for Heating Repair in New Orleans
While many dryer heating element repairs are excellent DIY projects, there are times to call experts:
- You’re uncomfortable working with 240V electricity
- The dryer is still under warranty
- Multiple components have failed or you suspect wiring issues
- It’s a gas dryer or complex stacked unit
- You need fast, guaranteed results
For your home’s central heating system, heat pump, or full HVAC needs, trust the licensed professionals at Zees AirConditioning Inc. Our team provides expert heating repair New Orleans, 24/7 emergency service, and preventive maintenance across Gretna, New Orleans, and the entire Westbank area.
Contact Zees AirConditioning Inc. today for reliable, affordable heating repair and HVAC solutions:
📞 (504) 912-0490
✉️ Zaky@zeesairconditioning.com
📍 705 Wright Ave, Gretna, LA 70056
License #79676 (State of Louisiana – Mechanical)
👉 Schedule professional heating repair in New Orleans with Zees AirConditioning Inc.
We help thousands of local families keep their homes comfortable year-round — whether it’s a central heating repair, AC tune-up, or expert advice on appliance-related electrical concerns.
Conclusion: Take Control of Your Dryer Heater Repair Today
A failed heating element doesn’t have to mean an expensive service call or new appliance. With this detailed guide, the right tools, and careful attention to safety, most homeowners can successfully perform a dryer heating element replacement and restore proper drying performance quickly.
Remember the key takeaways:
‣ Always prioritize safety and power disconnection
‣ Test components with a multimeter before and after
‣ Clean the entire vent system thoroughly
‣ Replace related safety parts (fuse/thermostat) when practical
‣ Know when to call professionals — especially for gas appliances or complex issues
For all your home heating repair New Orleans, HVAC maintenance, AC repair, and comfort needs, Zees AirConditioning Inc. is your local trusted partner. Owned by Abdelhamid Zaky with over a decade of experience and Louisiana Mechanical License #79676, we deliver reliable, affordable service across the New Orleans metro area.
Ready for expert help?
Call (504) 912-0490 now for 24/7 emergency heating repair or schedule online.
👉 Visit Zees AirConditioning Inc. Heating Repair New Orleans page
Stay comfortable, stay safe, and enjoy perfectly dry laundry again — the DIY way or with professional support when you need it most.
This guide is for informational purposes. Always follow manufacturer instructions and local codes. If in doubt, consult a qualified technician.
Zees AirConditioning Inc. — Quality HVAC Solutions You Can Trust in New Orleans and Beyond.
FAQs
The most common sign is the dryer running normally but producing little or no heat. Use a multimeter to test for continuity — no reading means it needs replacement.
Often it’s smart to replace the thermal fuse and high-limit thermostat at the same time, as they frequently fail together due to overheating.
DIY parts usually run $25–$150. Professional service averages $180–$450 depending on model, location, and whether additional parts are needed.
If your dryer is under 10–12 years old and otherwise in good condition, yes — a new element can extend its life significantly and save money versus buying new.
Primarily lint buildup restricting airflow, causing the element to overheat. Poor venting, overloading, and age are other major factors.
Yes — restricted airflow makes the element work harder and run hotter, leading to premature failure. Annual vent cleaning is highly recommended.
A good set of nut drivers, screwdrivers, and especially a digital multimeter are essential for safe and accurate diagnosis.
Typically 8–15 years with proper maintenance and clean venting.
Gas dryers do not have an electric heating element. Issues usually involve the igniter, gas valve, or flame sensor — these require professional service for safety.